
This article’s title might inspire a couple question to my dear western viewers :
1/ what’s the difference between a toolbox and a tool chest ?
2/ what is Kaizen ?
The first question is mostly a french one, since I am french myself and the toolchests i’m talking about are nowhere to be seen around me, it seem however to be a very standard thing in any hardware store in North America or even United Kingdom, where i ordered mine from thanks to Ebay, for about 60 €uros
The second question is more exotic in it’s answer :
What is Kaizen ?
It is a whole concept, coming from Japan (yes, again) composed of words Kai (revision, correction) and ZEN (good) that therefore means “change towards the better” or “continuous amelioration”.
Specifically, it joins a whole philosophy and pursuit of efficiency and workflow fluidity.
The Kaizen toolchest is therefore a toolchest thought for being efficient and organized, simply.
STEP1 : The chest

According to Hollywood, every american garage contains one of those tool chests …and so they should, for this is extremely convenient in the way it allows for non-overlapping tool storage, wich is the first important aspect of my Kaizen plan.
It would indeed be easy to stuff the chest with random mess, and search through it every time you need any tool, but this would only result in a tremendous time waste each and every time , and only build up frustration…
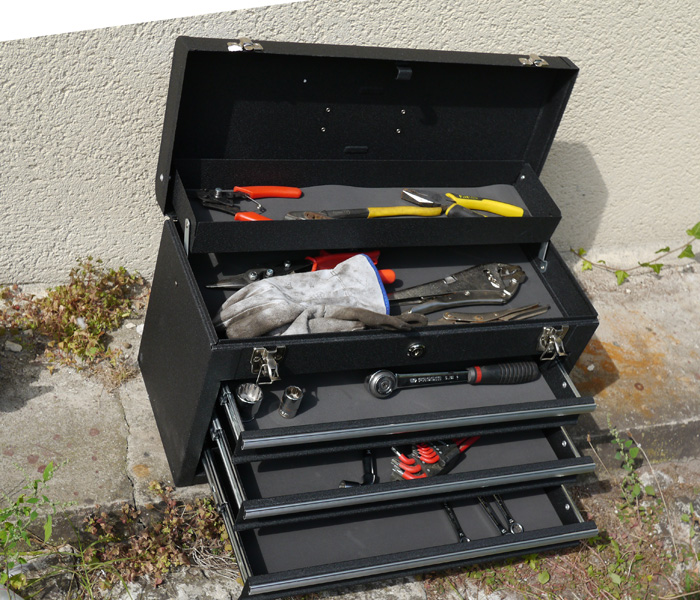
examples of non-Kaizen usage… and also a rough sorting draft, the first question to ask yourself being : Wich tools are the most important to me? In wich order shall i make them available?
let’s go on to interior arrangement , as the individual aspect is most important, since each usage requires it’s own customization.
STEP 2: agencing

Ukulele for scale.

The first step of Kaizenization (or kaizenizing? ) is the choice of the most important tools, and layout on the surface of each drawer , so each would be accessible without moving another one, the most direct way, in the most immediate orientation.
This is why the sockets are in front of the drawers, to not have to open them wide once you have the ratchet in hand, less common accessories go to the back !
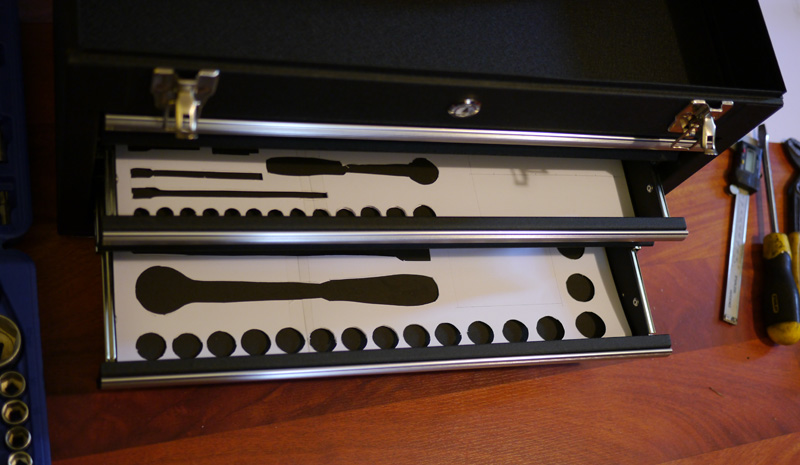 A bit of drawing paper (for stiffness) allows for testing in-situ, and in a spirit of continuous improvement, this test gives me the idea of sorting the drawers by weight, thus assigning the heavier stuff onto the lower drawer, for stability.
We may also notice that as previously mentionned, it’s possible to have every socket available by simply opening the middle drawer halfway, thanks to their forward agencing.
STEP 3: The foam.

The next step goes by the sports store to get some cheapest firness mats, i chose black and red for contrast , and cut them to the size of the drawers.
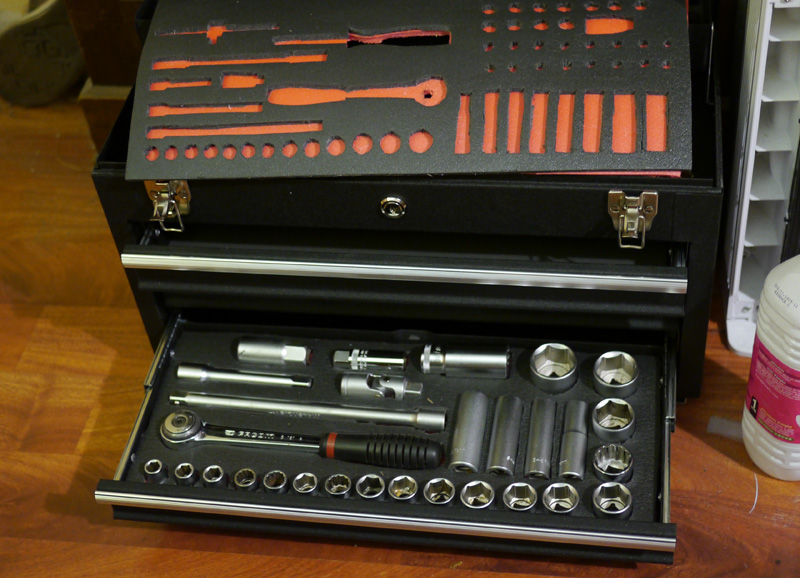
This is the goal. it’s long, but SO convenient!
The first (black) layer is cutout thanks to the stencil made of drawing paper seen earlier, then glued to the red one thanks to neoprene glue (contact cement) , it’s all about recovering the top layer’s underside,
then laying the top layer on the lower layer,
THEN, very important, detaching again, so the glue dries on both sides, as this is how neoprene cement works, it has to dry first and will stick to itself upon contact
lastly you can assemble both layers in a permanent manner.
this stick/unstick/stick back method allows to apply no cement to the visible parts of the lower layers, as it would stick to dust , and even to tools…
Finally, you might notice a cutout that goes through both layers, in such case, simply add one more layer underneath .

The result is simple and effective : the missing tools are immediately visible, and the other ones are accessible in the most simple manner.
In order to gain time, it is possible to buy dedicated foam under the name of “Kaizen foam”, wich is more expensive, and has the downside of having it’s layers unsticking on their own, as it’s made to be cutout, then peeled off, but it is easier to create indeed.
STEP 4: final touches.
The chest’s bottom is flat, wich is a bummer for a mobile tool chest that may rest on uneven gravel or rocks, dirty garage ground, and any other possibly rough surface that would ding/scratch/rust the bottom, a very simple solution to that involves a trip to the hardware store to grab some aluminium square tubes :

A few holes and rivets, and the chest now has feet to rest on, for even more finishing, i also stick adhesive rubber pads , to avoid scratching the more delicate floors
LAST STEP : appréciation
Or shall i say , admiration of the accomplished work, and the practical aspect of this storage that became kaizen …
Of course, the same philosophy may be applied to countless storages and furnitures, up to you to create your own Kaizen !
one example for your interior is often seen on internet thanks to the drawer chests from Ikea named “ALEX” 
you may also find several articles about alex dupes , wich for an even cheaper price will give you 6 thin drawers where other drawer cases will only give you 3 thick ones, using twice more drawers allows for twice effective more surface, at the cost of height, and a simple google search on Ikea’s ALEX will provide countless examples of makeup, beads or colorful ribbons storages organized with simple separators, for an amazing orderly result !